Friday, March 9, 2012
Overview of the Virtual Lab
This lab was a fun way to sum up all that I have done in the cardiovascular system! Throughout this lab there is a virtual patient and you are the doctor. You have to make them take tests such as using a stethoscope to listen to their heart beat and make predictions on the problem, take echocardiography images, and pedigree charts. Finally after this process is finished you have to come to a conclusion and try to determine what the heart condition may be. If you are right you win; if not you go on to another patient and try again. In my actual case I had a patient that had an irregular heart beat when I listened with the stethoscope. This patients heart you could hear two odd sounds. From this I determined he may have mod bradycardia and a mild mitral valve gegutation meaning blood was flowing back through the valves when it shouldn't be. He was complaining of dyspnea and fatigue when strenuous activity and from what I could tell he had a diastolic murmur meaning his second beat stretched out meaning blood was following back through the valve(s). Then I started on an echocardiograph test. From this the problem looks like the mitral valve is thickened and didn't seem to be moving properly. The valve leftlets moving poorly was leading to an obstruction between the left atrium and the left ventricle which was interfering with the blood flow. This condition is called Mitral Stenosis. My final test to the patient was using pedigree charts. This chart shows the patients family history and charts showing who in the family may contain this disease. These charts tell if a problem is recesive or not. Knowing that 2 of 6 children of 2 perfectly healthy parents are born with serious genetic diseases we determined from the patients charts that neither of his parents had this disease but a few of his cousins did. Iconcluded that the condition didnt seem hertiatory because he has relatives with the disease, but no parents or offspring with it. My final doctor's conclusion was that the patient was suffering from Mitral Stenosis with is a diastolic murmur. I let the patient know that it can be corrected with valve replacement surgery and it isn't fatal but symptoms will remain unless taken care of. I was correct with diagnosing my patient and so I won the game! Overall, this lab was a great way to wrap up the cardio system! And the game was actually very interesting, fun, and benifical to see how all the small parts of the cardio system work together.
Thursday, March 1, 2012
Blood Pressure and Heart Rates
It's estimated that about 50 million Americans have high blood pressure, and most don't even know it. High blood pressure is also called hypertension. It's a condition where the heart is working extra hard to pump blood through narrowed or constricted arteries. If you have high blood pressure, and it is left unchecked, you could potentially suffer a stroke, heart attack, kidney failure and other serious problems.
Because of the commonality of this problem, we decided to save some money and time by using the at-home, quick-reading technology to check our blood pressure rather than going to a doctor to be tested. My group (Steven, Sierra, and I) used both an automatic wrist monitor and an arm pump monitor to check our blood pressure. We took readings on both of these monitors and put them into graphs to compare them.

My group had 3 subjects (as shown on x-axis), we used both a wrist monitor (green) and an arm monitor (red), the darker of the colors represent the systolic pressures, the lighter of the colors represent the diastolic pressures, and the measurements of these pressures can be determined from the pressure chart (y-axis). Let's talk a bit more about what systolic and diastolic are. Systolic blood pressure is a measure of blood pressure while the heart is beating. Diastolic pressure is a measure of blood pressure while the heart is relaxed, between heartbeats. Systolic is clearly higher because the pressure rising while the heart is working hard and the diastolic is a lot lower because the heart isn't working so hard.This chart was a great visual aid to compare our data and analyze it. From this chart we can conclude we all have fairly similar and normal blood pressure.
Heart rate is the number of heartbeats per unit of time, typically expressed as beats per minute (bpm). Heart rate can vary as the body's need to absorb oxygen and excrete carbon dioxide changes, such as during exercise or sleep. The measurement of heart rate is used by medical professionals to assist in the diagnosis and tracking of medical conditions. It is also used by individuals, such as athletes, who are interested in monitoring their heart rate to gain maximum efficiency from their training.
While testing our heart rates the monitors also showed us our heart rates. It was interesting to record our heart rate on both monitors. This was our data:

This data was interesting to me because when reading about normal resting heart rates, an average heart rate should be about 60-90 bpm. My heart rate personally tends to be on the lower numbers of that average, but while testing my heart rate over the machines it was much higher. I read a little more into testing heart rates and sources said that during the process of testing the body often seems to get a bit nervous even when you feel relaxed. This is normal, but it often increases your bpm.
Overall, these charts were interesting to compare. We tried comparing data between male and female, wrist and arm, etc. Charts often help with data analysis which is exactly what these did! It was fun to mess around with this equipment and it helped me to understand blood pressure and heart rate measurements even that much more!!
Tuesday, February 28, 2012
THE WHOLE WORKS!! Heart Anatomy, Blood Flow, Dissection, and Data!!
Here is a massive Prezi containing a ton of information!! I have information about heart anatomy talking about the parts, their locations and functions. The next section is the blood flow; I have multiple diagrams with blue (deoxygenated blood) and red (oxygenated blood) representing the course of the blood flow throughout the heart. The third section of this post is the pictures of our cow heart dissection. The final section is more of a lab write up. It is a very informal, basic lab write up with a graph of data analysis and a good conclusion backed by some reflection questions.
Friday, February 3, 2012
Sheep Brain Lab


This is just a post of the sheep brain direction lab just to mainly show photographs I captured during the process. We did this lab in order to understand the nervous system a bit better. This photos are of my group (Audie, Steven, and I) that cute our sheep's brain horizontally, while some of the photos are of other groups sheep brains that are cut in saggital and coronal planes. This was an interesting lab because once dissected we could see the white and grey matter such as in the last picture. We could also pick out certain structures of the brain that remained. The nervous system has been a very interesting topic and I have greatly enjoyed all of the studies we have done with it! Hope you enjoyed the pictures!
Thursday, February 2, 2012
Vision and the Optic Nerve (Nervous System)
Here is video that Audie, Steven, and I made about vision and the optic nerve. This is an overview of vision and how it works with the nervous system and then it goes into detail about the optic nerve. It is a fun video that is great for teaching while still be entertaining. Check it out here.
Tuesday, January 24, 2012
Leech Neurophysiology Lab Write Up
Introduction to the Neurophysiology Leech Lab
There were many materials used in this lab:
Our class followed an online virtual direction of a leech (we did this virtual lab, rather than in the classroom, because all of the material is too expensive and the precise procedures on such a small area would be hard without training and experience). This was to demonstrate and educate us on neurophysiology. Our objective was to record electrical activities of individual neurons while we delivered mechanical stimulus to the attached skin, inject fluorescent dyes into the neurons to visualize their morphology, and identify the neurons based on the morphology and the response to stimuli, comparing them to previously published results.
There were many materials used in this lab:
- pins
- scalpel
- dissection tray
- probe
- forceps
- feather
- scissors
- leech tank
- 20% Ethanol
- leech tongs
- dissection microscope
- micro-manipulator- A device used to position items with sub-micrometer precision in three dimensions. Here we mount our electrode on it to guide it accurately to a neuron.
- Oscilloscope: Basically a sophisticated voltmeter. What you see on the screen is a real time display of voltage (vertical) plotted against time (horizontal). Useful because voltmeters can't track rapidly changing voltages, and even if they could, you couldn't read anything.
- leech
Procedures:
Step 1
We caught and anesthetized the leech in a 20% ethanol solution.
Step 2
We pinned the leech's dorsal side up through the suckers onto a dissection tray and stretched the animal open.
Step 3
We used scissors to make a cut in the skin along the mid-line on the dorsal surface. Then we used the forceps to pull the skin back from the incision and pinned that skin down so that we could see the structures on the inside of the leech.
Step 4
We carefully removed the gut and other internal structures to expose the nerve cord.
Step 5
We then noticed the swellings on the sinus which contained the segmental ganglia of the nervous system and we cut a small piece in the body wall under the ganglion.
Step 6
We then made 2 parallel cuts across the leech and turned it skin side up and pinned it down.
Step 7
We cut the sinus with a scalpel and used the forceps to expose the ganglion and then we looked at it under a microscope (Clearly we couldn't dissect something this small so the cyberlab is great for steps such as these).
Step 8
We used the electrode over the ganglion to simulate the process of penetrating the cell. We then looked at the oscilloscope to tell us if we found a cell. The oscilloscope turned the signals from the cell into an sound wave display. We used the feather, probe, and forceps and watched how the cell responded. If the cell shows a spike then the cell responded in firing an action potential. We then compared our data to that in the atlas. We then dyed the cell with fluorescent dye to see where the certain cells were located.
For background info on this step you can check out these links!
Nervous System background
Electrical Equipment background
For background info on this step you can check out these links!
Nervous System background
Electrical Equipment background
Step 9
Then we used the UV Switch to see the dye which allows us to see the cells structure.
Step 10
We then used the electrophysiological and neuroanatomical data to identify. After we finished this step for one cell we went back and repeated the procedure for all 5 different cells.
Data and Analysis:
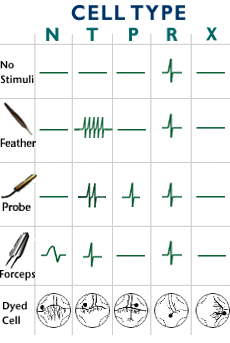
 This is what I identified as a type x-cell. I identified it as this type because of its position, structure, and its stimuli. The type x-cell recorded no stimuli when touched or poked with the stimulus tools.

 This is what I identified as a type n-cell. I identified it as this type because of its position, structure, and its stimuli. The type n-cell recorded stimuli when poked by the forceps.

This is what I identified as a type r-cell. I identified it as this type because of its position, structure, and its stimuli. The type r-cell had a constant record of stimuli even when it was not touched by any of the tools.


 After I identified each of the cell types I got a Congratulations note and this picture showed me all the placements where the cells could be found. This picture wrapped up all of the types of cells and helped me to know where to place them in the ganglion. It was interesting to learn that each of these types responded to different stimuli and that they each had thier own certain region. In the end, it all made a lot of sense as to why our bodies work the way they work. It is amazing how small of detail our bodies, along with others such as leech's, come down to. This lab really helped me to better understand the cell types and neurophysiology plays a huge role in our bodies.
Data and Analysis:
This is what I identified as a type p-cell. I identified it as this type because of its position, structure, and its stimuli. The type p-cell recorded stimuli when poked by the probe.
This is what I identified as a type n-cell. I identified it as this type because of its position, structure, and its stimuli. The type n-cell recorded stimuli when poked by the forceps.This is what I identified as a type r-cell. I identified it as this type because of its position, structure, and its stimuli. The type r-cell had a constant record of stimuli even when it was not touched by any of the tools.
This is what I identified as a type t-cell. I identified it as this type because of its position, structure, and its stimuli. The type t-cell recorded multiple types of stimuli. When touched by the feather the cell reacted a lot, the probe a little less, the forceps a little less, and finally, when nothing is touching it, no stimuli.
This is the atlas that I referred to help me determine the cell type of my data.
Conclusion:
After I identified each of the cell types I got a Congratulations note and this picture showed me all the placements where the cells could be found. This picture wrapped up all of the types of cells and helped me to know where to place them in the ganglion. It was interesting to learn that each of these types responded to different stimuli and that they each had thier own certain region. In the end, it all made a lot of sense as to why our bodies work the way they work. It is amazing how small of detail our bodies, along with others such as leech's, come down to. This lab really helped me to better understand the cell types and neurophysiology plays a huge role in our bodies.
Tuesday, December 20, 2011
Research (Unconscious Minds)
I have created this comic called Unconscious Mind (research) to show information on a current research in the medical science of the mind. I know this topic also deals with psychology, but after reading this article called Unconscious Processing: Things You Didn't Know You Didn't Know it is clear that not all unconscious processing is just brain activity, but how that brain activity effects the body and homeostasis. I have learned about this recently in pyschology & about muscles in anatomy, so I have some prior knowledge to the subject. This cartoon is just a fun/cute way to describe to bare minimum of what I got out of this research. I realize how it impacts everyones daily lives and so I thought it would be interesting to read more about.
Subscribe to:
Posts (Atom)